
Monday, December 31, 2012
Tuesday, December 25, 2012

Monday, December 24, 2012
Christmas Tree Decoration
Such a festive time, with sparkling lights and colourfully decorated trees....This year I decided to try using some of those plastic hollow ornament balls I got on clearance last boxing day from Micheals, and make my own ornament.

I love how it came out, but have to confess it was a lot of work to get the image in there just right....picture me with tweezers trying to move it around while hubby holds the plastic ball thing....
The main image is a digi by Paper Garden Projects. which I printed twice, once the "normal" way, and once flipped to be it's mirror image (Using Silhouette software). The printed, handcut and coloured with Copics. The background circle (image also from Paper Garden Projects) was printed from the printer on to an Acetate sheet, then after it dried I rubbed gold ink on the edges. The 2 images were then glued on either side of it. All that wasn't the hard part, as mentioned, getting it in to the ball just so was. After that I added some glitter stuff in to the ball to float around the bottom, and some ribbon treatment on the mouth/top of the ball.
After all that effort it's a good thing that the final product looked good!

Sunday, December 23, 2012


Saturday, December 22, 2012
Christmas Village
It is really fun playing with my new Silhouette and seeing what can be built using the digital die cuts.
Here is the start of a Christmas Village I'm planning, the first house being built using a house template in the Glitter and Memories digi pack at the DigiChick.

Here is the start of a Christmas Village I'm planning, the first house being built using a house template in the Glitter and Memories digi pack at the DigiChick.

This was surprisingly easy to make. First, I printed the pieces using my Silhouette on to SU Coordinations card stock, then pressure embossed the roof and main body pieces, and quickly sanded. Folded them and glued everything together and added a Robins Nest dew drop for a door handle. It was, really, shockingly easy for something so neat looking :-)
The nice thing is that the roof is a lid that opens and closes, so you can put one of those fake, battery operated tea lights in there, which looks really cool on the mantel :-)
Wednesday, December 19, 2012
Gift Bag Tutorial
Here are a couple of gift bags I made using my Silhouette and templates from the Digichick.


You can see more bags using these fabulous templates on the Hybrid Chick website.
Monday, December 10, 2012
DVD Gift Bag
Here's a fun project I put together using my Silhouette using digi papers and images. It was quick and easy and a nice break from colouring, and better yet, get's me a nice packaging for a Christmas gift.

I put together a tutorial to make this which you can see at the Hybrid Chick, following this link: http://www.thehybridchick.com/2012/12/dvd-gift-box/
The papers and materials are by Paper Garden Projects.

The papers and materials are by Paper Garden Projects.
Sunday, December 9, 2012
Card Caravan - Holidays
Happy Sunday! The holidays are rapidly approaching so the Hybrid Chicks have pulled together some lovely cards and projects featuring the holidays for the current Card Caravan.
Here are some cards I made for the challenge (you know I LOVE holiday cards, LOL!)


We hope you'll join us and play along. The challenge is open to both cards and projects and is open for 2 weeks. Please share with us the lovely holiday creations you are working on at the Hybrid Chicks challenge page.
I'm entering these cards in the following challenges:
Craftymess challenge - Vintage Christmas
One stop craft challenge - Christmas friends
Speedy and Friends - Red and Green
Card Crafters Circle - December Celebrations
Emergency crafter - Deck the halls
Critter Sketch - Christmas anything goes
Love to Create - Holiday Cheer
Here are some cards I made for the challenge (you know I LOVE holiday cards, LOL!)

This first one features digital stamps from the stamp set Wish List Letter to Santa Bundle by Etc by Danyale. To dress it up I put glossy accents over the stars, white craft ink over the embossed background panel, and then a little bit of a cotton swab glued to Santa's hat.

This second one uses paper from the Sugar Sands Christmas Beach Bundle by Etc by Danyale, sentiment from Christmas Foliage Digital Stamp Set by Paper Garden Projects, racoon from Loving Critters Digital Stamp Set by Paper Garden Projects, and Poinsettia made from Christmas Foliage Digital Stamp Set by Paper Garden Projects

This last coordinates Snow Flurry Cut Outs by Paper Garden Projects, Tis the Season by Wishing Well Creations, The Merriest by Elise’s Pieces.
We hope you'll join us and play along. The challenge is open to both cards and projects and is open for 2 weeks. Please share with us the lovely holiday creations you are working on at the Hybrid Chicks challenge page.
I'm entering these cards in the following challenges:
Craftymess challenge - Vintage Christmas
One stop craft challenge - Christmas friends
Speedy and Friends - Red and Green
Card Crafters Circle - December Celebrations
Emergency crafter - Deck the halls
Critter Sketch - Christmas anything goes
Love to Create - Holiday Cheer
Thursday, December 6, 2012
New Releases at the DigiChick - Christmas!
Happy Thursday! I always start to perk up around this time of the week since I know the weekend is around the corner :-). And for me it's kind of like friday since tomorrow I get to go on a course instead of to the office---I will get to wear jeans instead is a skirt, yay!
Anyway, another good thing about Thursdays, I've discovered is new releases at the Digichick, and today I've got some creations to share featuring the new Christmas Retrospective set by Quirky Twerp.


Anyway, another good thing about Thursdays, I've discovered is new releases at the Digichick, and today I've got some creations to share featuring the new Christmas Retrospective set by Quirky Twerp.


Tuesday, December 4, 2012
Card Caravan - Winter photo inspiration
Here are a couple of winter photo inspired cards I made for the Hybrid Chick, for the current Card Caravan. They provided a beautiful winter picture for us to use as inspiration, and this is what I came up with.

This card (above) is made using papers and images from a new digital kit from Etc. by Danyale called Christmas Magic. I printed the digital paper, frame, and bird on to card stock, cut it out (using my new Silhouette!), rubbed some brown craft ink on the edges of the background sheet, layered up the bird and frame with pop up dots and added some tule and pearls. Super quick and easy!
 This card features lovely papers with swirls and tree from the Winter Caprice set by Sherwood Studio, as well as sentiment from an old SU set, and the fancy label die by Spellbinders.
I hope you will check out the challenge and play along with us....you've got a couple days left to do so!

This card (above) is made using papers and images from a new digital kit from Etc. by Danyale called Christmas Magic. I printed the digital paper, frame, and bird on to card stock, cut it out (using my new Silhouette!), rubbed some brown craft ink on the edges of the background sheet, layered up the bird and frame with pop up dots and added some tule and pearls. Super quick and easy!

I hope you will check out the challenge and play along with us....you've got a couple days left to do so!
Saturday, December 1, 2012
Recycling yogurt containers
So, that time is here where we are trying to put together gifts, both large and small, for all those people in our lives. The malls are busy, and so are our craft rooms!
I have a few projects I've come up with over the years and recently that work well for me for Christmas gifts, and today I wanted to share with you a cute little decorating container that can be used to hold change, paperclips, or a plant, whatever the need is....and more importantly, it's made with stuff from around the house!


I have a few projects I've come up with over the years and recently that work well for me for Christmas gifts, and today I wanted to share with you a cute little decorating container that can be used to hold change, paperclips, or a plant, whatever the need is....and more importantly, it's made with stuff from around the house!
I've prepared a detailed tutorial, which is posted at the Hybrid Chick site, I hope you will check it out. And of course, if you have any questions or need more details, please let me know.
And here's another finished picture of it, holding a plant (ok, I made a "new" plant for this with clippings, I hope they take!)

I have a couple of other projects coming up to share with you for quick and easy gifts, but would you take to time to fill in the little survey on the side, or in the comments, let me know what types of home made gifts you are making this year?
Tuesday, November 27, 2012
Heartfelt Creations Alumni November Blog Hop
Today we've got a short Heartfelt Creations Alumni blog for you to join along in, with some inspiring creations, and a prize too! I hope you'll join us and hop along :-) If you started at the beginning then you would have come here from Sarah's blog.
I have a cute winter themed card for you, I really enjoyed pulling out my Copics and Stickles for this one :-)
The sweet bear is from Bear-y Winter PreCut Set HCPC3358 from Heartfelt Creations. I've coloured and glittered it up, and then simply overlaid the tree frame cut using a die by Memory Box. The dark blue frame is airbrushed in using the Copic airbrush system.

Here is the order of the blog hop - follow along and leave comments along the way.
Kristina ---->You are here!
The hop will close Friday November 30th at midnight EST, so hop along and leave comments with each of the ladies between now and then for your chance to win a $25 gift certificate to shop at Heartfelt Creations. The winner will be announced on Saturday December 1st.
I hope you find some inspiration and ideas along the way :-)
Wednesday, November 21, 2012
Got my Silhouette!
Finally, after weeks of waiting, the postman delivered my Silhouette...Yay!!! I was very excited to pull it out of it's box, and immediately had to find something to do with it LOL!
Lucky enough, I had a chance to play with a new set of vintage Christmas Ephemera from Quirky Twerp at the Digichick shop, that I was able to quickly and easily set up a cut file for in the Silhouette, so I could show off to hubby the neat print and cut features of the machine.

Lucky enough, I had a chance to play with a new set of vintage Christmas Ephemera from Quirky Twerp at the Digichick shop, that I was able to quickly and easily set up a cut file for in the Silhouette, so I could show off to hubby the neat print and cut features of the machine.

To make the background, I used a digi paper/shape from the Valentine Retrospect scrapbooking set, also by Quirky Twerp (am I not creative??! who else would be using Valentine papers for a Christmas card LOL!)
After printing and cutting the base and the puppy, I simply embellished with some ribbon, dew drop, and the punched holly is from a Martha Stewart punch.
Best news--it only took about 15m to put it together! I love colouring, but sometimes I also love not having to colour :-)
I'm entering this in the following challenges:
Creative Cutting Challenge - Christmas card (using digital files)
Forever Friends Challenge - use ribbon
The Paper Girls Challenge - Christmas or Winter
Sunday, November 18, 2012
Designing with the Hybrid Chick
Today I have a couple of cards to share with you featuring digital goodies from the Digichick. I am excited to share with the news that I am now part of their Hybrid Chick design team! Yay! Here are the first couple of cards I made experimenting with the digital images and papers:


This second one was actually very easy and fun, and something quite different than I have done before. I used the digital kit called Sugar Sands Christmas Beach Bundle. There are a ton of cool digital papers there, but the thing is, I haven't used digital papers, so I wasn't sure if my printer would do an adequate job, or if this was really going to work for me, but I have to say, apart from the brown base layer in the card, the rest of the card was all made using one sheet of card stock (I used Aquabee marker paper). And everything coordinates! The flower, the leaves, the sentiment, the vintage image, and the background paper all came from that kit. So nice to not have to dig through my craft room to find that perfect sheet of paper or that perfect prima! For the leaves and flower, I printed them, cut out (by hand) and then shaped on a mat and layered on the card, adding a button and some ribbon to dress it up.
Anyway, I know that many of you, my crafty friends, haven't tried using digital images yet, and I am planning a little tutorial on how to use the digital images using different software. I tend to use MDS now, but all of what I did could have been done in Word, which most folks already have on their computers, so let me know what types of things you'd like a tutorial on with some step by step photos and I will put something together for you :-)
And also, a huge shout out thank you to Laurie at Doodle Pantry for helping me out with getting my watermark edited to integrate with the Hybrid Chick one. If you ever need a custom watermark, Laurie is the go to person!
I am entering the following challenges with these cards:
Robyn's fetish - make it vintage
Just keep on creating - Christmas
Simon Says stamp and show - stamp without ink
The Pink elephant - punches and dies
Speedy Fox/Marks Finest - pop up (hard to see in the photos, but several pop up dots used on both cards.
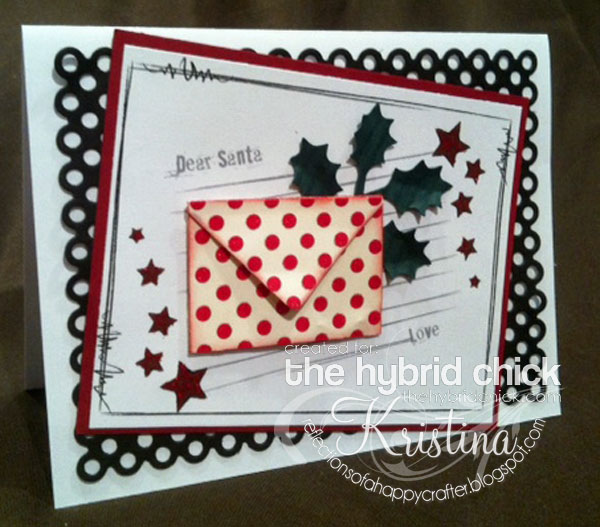
The first one, above, uses the doodle border, Dear Santa letter and the stars from the Wish List Letter to Santa Bundle. I laid the items out on my page in the computer using the MDS software, and then sent to print. I added some red sparkly stickles over the stars, added the holly leaves (Martha Stewart punch) and made the envelope, then layered all together.

This second one was actually very easy and fun, and something quite different than I have done before. I used the digital kit called Sugar Sands Christmas Beach Bundle. There are a ton of cool digital papers there, but the thing is, I haven't used digital papers, so I wasn't sure if my printer would do an adequate job, or if this was really going to work for me, but I have to say, apart from the brown base layer in the card, the rest of the card was all made using one sheet of card stock (I used Aquabee marker paper). And everything coordinates! The flower, the leaves, the sentiment, the vintage image, and the background paper all came from that kit. So nice to not have to dig through my craft room to find that perfect sheet of paper or that perfect prima! For the leaves and flower, I printed them, cut out (by hand) and then shaped on a mat and layered on the card, adding a button and some ribbon to dress it up.
And also, a huge shout out thank you to Laurie at Doodle Pantry for helping me out with getting my watermark edited to integrate with the Hybrid Chick one. If you ever need a custom watermark, Laurie is the go to person!
I am entering the following challenges with these cards:
Robyn's fetish - make it vintage
Just keep on creating - Christmas
Simon Says stamp and show - stamp without ink
The Pink elephant - punches and dies
Speedy Fox/Marks Finest - pop up (hard to see in the photos, but several pop up dots used on both cards.
Monday, November 12, 2012
Progressive challenge with Flourishes
This weekend Flourishes hosted a progressive challenge. I played along with it and had a lot of fun, and wound up creating something fresh and interesting and different than my normal style, too, which I enjoyed. Here you go:

I'm entering this card in the following challenges:
Flourishes Progressive Challenge
Crafty Card Makers - more than one punch/die cut
Forever Friends - Use ribbon or twine
The Pink Elephant Challenge - punches and dies
Come and get it challenges - flourishes and swirls

At Christmas I often bake cookies, then package them up all pretty and give them as gifts to colleagues or neighbours. I'm not sure if I'll do that this year, as I'm cutting back on baking with an eye to losing some weight (sigh!) but figure eventually I'll break down and bake, and when I do I'll have this pretty card to go with the treats.
I've used a newly released set by Flourishes called Fresh Baked. The picture was stamped in Tim Holz black distress ink, and coloured with Copics, and then I added sparkly stickles in two different blue colours. The sentiment was stamped in Onyx Black Versafine, with some colour carefully added with Copics, and decorated with some rhinestones.
The other day I was at a stamping class and noticed that at least half the people there (including me couldn't make bows easily. For myself, I knew it was because my beloved Bow Easy was at home, LOL! I sure do depend on it! I used it here for the lovely double bow added on the top.
I'm entering this card in the following challenges:
Flourishes Progressive Challenge
Crafty Card Makers - more than one punch/die cut
Forever Friends - Use ribbon or twine
The Pink Elephant Challenge - punches and dies
Come and get it challenges - flourishes and swirls
Some of our favorite things
For us here in my part of the world, this was the last day off of the last long weekend (ie. 3 days due to a stat holiday) before Christmas...eek!! I went by Micheals this morning at about 10 am and it was hopping, crafty Christmas decorations were flying off the shelves and there was a huge line up to check out. I expect a lot of beautiful things were not only purchased but also created today!
For my part, I have a festive card to share with you, what else would you expect LOL!
 My challenge here was to make a card using only Gina K stamps, using DP from her online store, an embossing folder, a die cut, and hand cut stitching...and I did it, amazingly enough!
The sentiment and flower are both from GinaK (rubber) and the pin stripe paper in the back is digi paper from her store. For the flower, I stamped it 3 times, hand cut it out, and then shaped and layered it up, and added a pearl centre. I added some pearl paint on top of the embossed tree, and used the Copic Airbrush system to add colour to the sentiment.
Good luck to all of you as you get ready for Christmas!
I'm entering this card in the following challenges:
GinaK - Free for all Friday - a few of our favourite things (embossing folder, die cuts, hand cut, DP (GKD digi paper Basic Wardrobe Digital Paper Pack)
ABC Christmas Challenge - Vibrant colours
Clear it out challenge - Red (using old red DP that I've been hoarding for several years)
CCEE Stampers - use a portion of an embossing folder
Southern Girl Challenges - Christmas
Christmas Stamping all year long - anything goes
For my part, I have a festive card to share with you, what else would you expect LOL!

The sentiment and flower are both from GinaK (rubber) and the pin stripe paper in the back is digi paper from her store. For the flower, I stamped it 3 times, hand cut it out, and then shaped and layered it up, and added a pearl centre. I added some pearl paint on top of the embossed tree, and used the Copic Airbrush system to add colour to the sentiment.
Good luck to all of you as you get ready for Christmas!
I'm entering this card in the following challenges:
GinaK - Free for all Friday - a few of our favourite things (embossing folder, die cuts, hand cut, DP (GKD digi paper Basic Wardrobe Digital Paper Pack)
ABC Christmas Challenge - Vibrant colours
Clear it out challenge - Red (using old red DP that I've been hoarding for several years)
CCEE Stampers - use a portion of an embossing folder
Southern Girl Challenges - Christmas
Christmas Stamping all year long - anything goes
Saturday, November 10, 2012
Country cottage
The weekend is here again, Yay! And it is a 3 day weekend. I am off to a good crafty start. Today I have a card to share with you using one of my favorite Thomas Kinkaid images.
Usually when I use these images, since there is so much detail, I tend to do them in black and white with no colouring. However, for this one, I did colour using Copics, and I'm really happy with the results.

The technique I used was to stamp the image using Versafine on to Velum. Then I let it dry for a while, then coloured the reverse side (the back of the sheet) with Copics--that way there was no smearing. Putting a white piece of paper underneath the paper when I was colouring made the stamped image pop up and easy to colour.
This may seem intimidating, however it was axtually not too long to colour, as the image is naturally shaded, so for example on the grassy area, I only used one green marker, and the different colours and "light" that shows through is due to the stamped image being shaded in some areas.
To finish it off, I stuck in in a frame, added some pearls, popped it up with dimensionals and mounted on the base.
I'm entering this card in the following challenges:
Cornish Heritage Farms - Thomas Kinkaid images
The Squirrel and the fox - flowers, hats or horses (we've got flowers and horses here)
MarkerPop Blog - Colour with markers, NOT on white paper (I coloured on velum)
Addicted to stamps - flowers
Little Red Wagon - Colouring
Sunday, November 4, 2012
Inspiring cards
Today I have some happy inspiring cards to share with you. On World Card Making Day I was lucky enough to win a fun card kit from Simon Says. Since it arrived I have pulled each piece out and touched it, and held it up against the others, showing them all to hubby one by one (boy, is he thrilled LOL!), but just couldn't bring myself to use them. I am such a hoarder! Finally, I opened the stamp set and dug out the washi tape and buttons, then found items in my craft room that kind of went with the theme, so that I could save the lovely one of a kind pieces from the kit for a future day {roll eyes here}.
So here are the first three cards:

The colour scheme is based on what they had in the May 2012 card kit which Simon Says sent me, but slightly substituted. The main colours are Pool Party, Real Red, and Chocolate. I've used a Stampin Up digi set in MDS to create the balloons. The sentiment has been stamped in Versafine in a brown colour called Vintage Sepia.

In the MDS software, you can choose to recolour all or part of an image, so I coloured the baskets chocolate brown, and the other parts the Real Red and Pool Party, so that they would completely coordinate with my paper.

You may notice some shine on the balloons, I printed them on Best settings on photo paper, which came out really well, and then hand cut them.

This last one came out completely crooked, but I figure I'll give it to someone forgiving. Despite the crookedness, it's still my favourite of the bunch.
So a huge thank you to the folks at Simon Says for all the inspiration they gave me with this stamp kit, even though I'm only using a couple of items directly from it, I have gotten a lot of enjoyment from that card kit.
And on to other news, yesterday I finally ordered a Silhouette cutting machine, after wanting one for over 3 years, I'm so excited!!! If you have any tips or suggestions for getting started, please share those with me. I've been madly searching online for tips and tricks (and of course, free cutting files LOL!), and have loaded the software up and experimented a bit. Now I'm waiting for the post now to bring it to me, sigh! I'll be thrilled with any suggestions you all have to share with me on what has worked or not worked for you, or sites you'd recommend I'd check out online :-)
I'm entering these cards in the following challenges:
Card Crafters Circle - Patterned Paper
Sentimental Sundays - Dimensions
Hybrid Chicks - National Chocolate Day (chocolate coloured sentiment and accents)
Pink Gem Challenge Blog - Polka dots
Totally Gorgjuss - Anything with a button
Sweet Pea Stampers - Support
Thursday, November 1, 2012
Spring themed Tissue box holder
I've been cleaning up my computer files and deleting old photos to make room on my hard drive and came across these pictures for a fabulous project I made quite a while back, which seems to yet another one that missed my blog. Since I loved this project, I thought you might like it too so I thought I'd share the photos with you.

This tissue box cover was made using a tutorial from Splitcoast Stampers that you can find here: http://www.splitcoaststampers.com/resources/tutorials/tissueboxcover/ It is actually very easy to create the box itself, and then it is up to you to decorate the way you want.


All the flowers and butterflies, hummingbird and lady bugs are also from Heartfelt Creations. What made this feasible and not too labour intensive was that there were coordinating dies to accompany many of the stamped images, so I didn't have to spend too much time doing hand cutting.
The lace on the edges was from our local fabric store, and I used some distress ink on the edges for depth.
I hope this inspires you to try out this tutorial, it was fun and relatively easy. I think now I'll have to do a Christmas themed one!

This tissue box cover was made using a tutorial from Splitcoast Stampers that you can find here: http://www.splitcoaststampers.com/resources/tutorials/tissueboxcover/ It is actually very easy to create the box itself, and then it is up to you to decorate the way you want.

On the top, you see that I used pop up foam dots to put a pretty frame over the opening. The frame is made with the decorative oval window die from Heartfelt Creations.

All the flowers and butterflies, hummingbird and lady bugs are also from Heartfelt Creations. What made this feasible and not too labour intensive was that there were coordinating dies to accompany many of the stamped images, so I didn't have to spend too much time doing hand cutting.
The lace on the edges was from our local fabric store, and I used some distress ink on the edges for depth.
I hope this inspires you to try out this tutorial, it was fun and relatively easy. I think now I'll have to do a Christmas themed one!
Tuesday, October 30, 2012
October Blog Hop - Heartfelt Creations Alumni
Today we've got a short Heartfelt Creations Alumni blog hop going, with a prize available, so we hope you'll join us and hop along :-) You should have come here from Olga's site, and if you would like the jump to the beginning, go on over to Dina's blog.

This card was pretty quick and easy to make, and features the Poinsettia 2 PreCut Set from HC, which coordinates with Spellbinders 2011 Heirloom Ornaments die cut.
Here is the order of the blog hop - it is a short one this month!
The hop will close Friday November 2nd at midnight EST, so hop along and leave comments with each of the ladies between now and then for your chance to win a $25 gift certificate to shop at Heartfelt Creations. The winner will be announced on Saturday November 3rd.
UPDATE: The random draw for the bloghop has been done and the random winner is Lisa808. Congratulations, Lisa!
We have sent you an email with details, if you don't get it for any reason, send me an email.

This card was pretty quick and easy to make, and features the Poinsettia 2 PreCut Set from HC, which coordinates with Spellbinders 2011 Heirloom Ornaments die cut.
Here is the order of the blog hop - it is a short one this month!
Dina Kowal - mamadinis.blogspot.com
Tesa Broman http://tesasscrap.blogspot.com
Kristina - You are here!
The hop will close Friday November 2nd at midnight EST, so hop along and leave comments with each of the ladies between now and then for your chance to win a $25 gift certificate to shop at Heartfelt Creations. The winner will be announced on Saturday November 3rd.
UPDATE: The random draw for the bloghop has been done and the random winner is Lisa808. Congratulations, Lisa!
We have sent you an email with details, if you don't get it for any reason, send me an email.
Saturday, October 27, 2012
Ho Ho Ho
Ho Ho Ho! I may not have been all that creative today, but I've been finding some Christmas gifts for myself! To share with you, are a couple more unposted projects. Plus I found a long forgotten stash of charms, dimensionals and double sided tape in my craft room, yay!
So here is yet another unposted project, this one from a couple of years ago, don't know why I never posted it for you, but here you go, I hope it inspires some fun holiday decorating:

The cute birdhouse was made using a template I found it here. I cut it out of Kraft paper, and sprayed the box with Walnut Gold Tattered Angels glimmer spray. The bird is a Heartfelt Creations stamp, that was coloured with Copics then cut out with a coordinating die cut. I made the decoration over the "door" by stamping an HC image, colouring it, adding glossy accents as well as 3 rhinestones. I cut the roof using green coordinations paper, embossed it, then sanded it.
Next, a super quick and easy card:

Here I used an SU digi set, printed it, cut out with A2 Card Creator dies, and added some airbrushing. Easy peasy!
We'll see what tomorrow brings, hopefully some really fabulous fresh creations....(either that or cleaning the kitchen, hmm.....)
Easy night scene
Happy Saturday! I hope you have all been enjoying a good weekend.
Today hasn't been particularly inky, I just couldn't decide what to work on! First I dug out all my favourite pretty papers that are too precious to use, and thought about making something with them, and then I went and looked at some new die cuts that I got and haven't used, and then decided I needed to make some boxes to hold my cards and went through the tutorials at SCS.....not the most productive day!
Anyway, I don't have anything new made today to share....my sample box to hold cards is a bit wonky, and I think I'll scrap this first 'prototype" and just move on to the next one. I do have a couple of things to share with you though.
First up, I was digging through my blog trying to find a picture of this cute container I had decorated, which I could not find anywhere on my blog, so here it is (again?)...

The flower was stamped using a Heartfelt Creation stamp and cut out using the coordinating die cut. I added some extra snips with my scissors, shaped it and then layered on top of this container, decorating with flower soft and gala glitz and robins nest due drops. The base container is from a container of body butter, which i peeled the labels off of and ran through the dishwasher (got to love recycling/repurposing!)
Secondly, here is a card I made recently that hadn't made it up here yet.
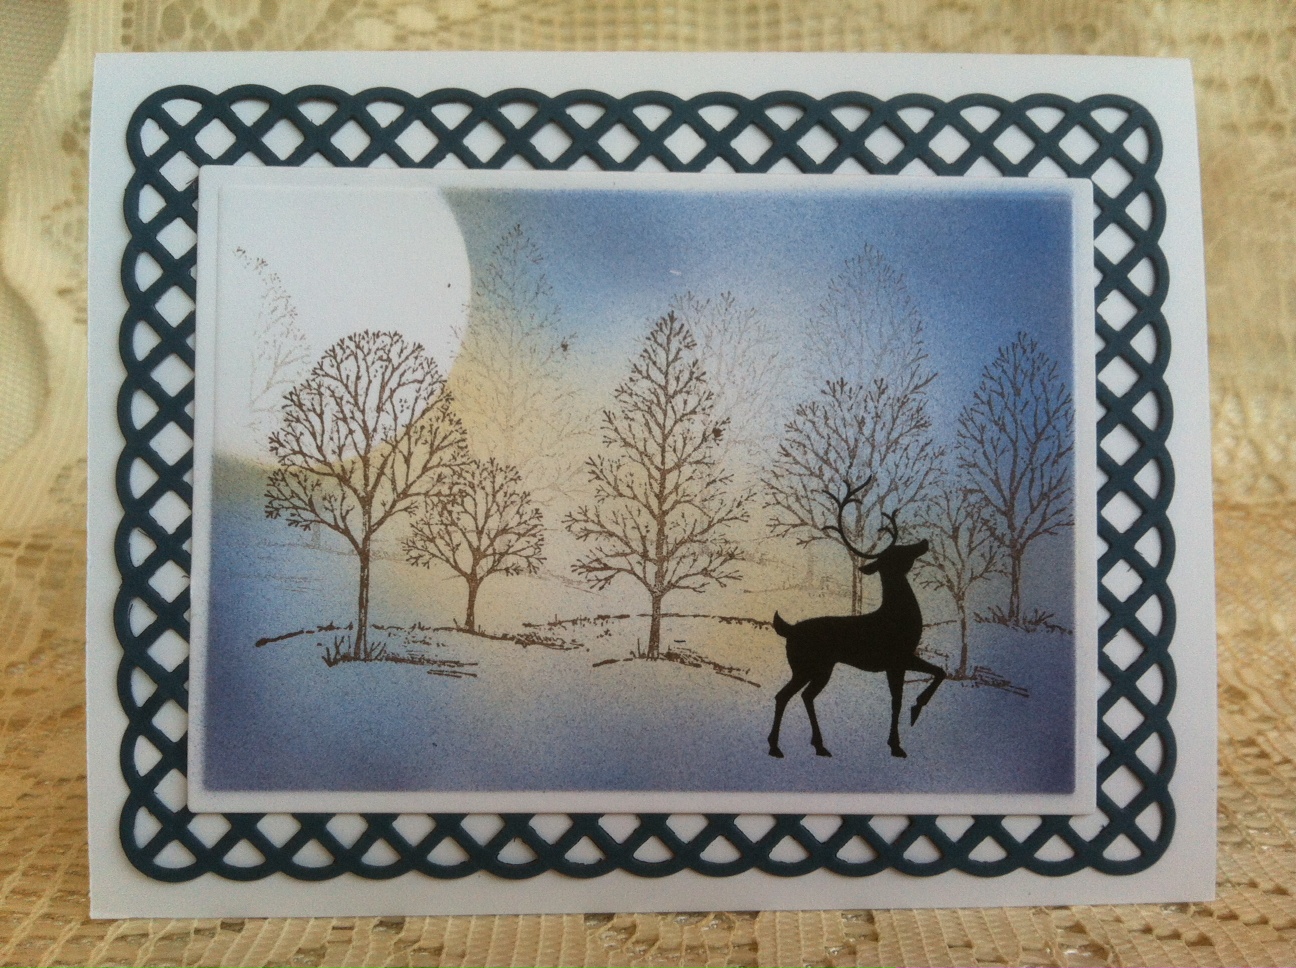
I've seen a lot of similar cards to this in the SU gallery and decided to CASE them since I love the peacefulness of the night scene. The deer was printed using a digi from SU, then I stamped the trees in the background, masked the moon area with a punched circle and airbrushed the rest. the lovely border is made using one of the A2 card creator dies by Spellbinders.
Wish me luck tomorrow, hopefully I will be more purposeful in my craft room and actually make something LOL!
Monday, October 22, 2012
Famr scene
Sunday morning is here again, hope your weekends have been good so far!
Yesterday was a very inky day, and I got 7 fabulous cards done! My SIL and MIL and I all enjoyed a fun day together chatting and crafting away, it is so inspiring to "play" with other people.
Here is a card I made to play along with this weeks Cornish Heritage Farms challenge for a Give Thanks card in red and white.

At first when I saw the challenge I didn't have any good ideas. I thought I could only use red and white with not even black ink, but then I went through and looked at all the lovely creations by their design team and saw that yes, black ink was ok, and even a bit of other colours, so I dug out these old Scene It stamps by CHF that I have been hoarding in my craft room.
There is some very faint colouring with non red colours, so it wouldn't be too stark, but I really focused on the red. As usual, all colouring is with Copics. I will give this card to our local farmer, who is still providing us with fabulous weekly produce baskets.
I'm entering this card in the following challenges:
Cornish Heritage Farms - Give thanks in red and white
Cards galore - Anything goes
Avaderes - Thankfulness
Tammy's Scrapin Corner - Anything goes
Sunday, October 21, 2012
Peaceful bookmark
Another post for today, at least there's lots of variety here for you all to look at!
Here is a bookmark I made for my mom, and featuring a beautiful pussy willow image by Marks Finest Papers.

I airbrushed in light blue around the main image (by Marks Finest) in blue, as well as lightly coloured it with Copics, then added some sponging of Tim Holtz Distress ink (Linen) on the edges, added a fancy brad from SU that I'd had stashed away for about 2 years (too precious to use LOL!) and some SU ribbon for decoration. The sentiment is from SU and was stamped using Versafine Onyx Black, my favorite ink to use for sentiments since it is so crisp.
My mom reads a lot and lives far away, so this is easy to mail and will make her think of me when she uses it, so I am really happy to have made it.
I'm entering this bookmark in the following challenges:
Marks Finest Papers, FOSTV Altered item/not a card
Inky Impressions, Anything but a card
Crafty Sentiments, Ribbon or bows
Stamptacular Sunday, No Rules
Creative Inspiration, Anything goes
Through the craftroom door - Anything goes
Featuring the sentiment
Here are a couple more of my weekend creations. I just love how the die cuts accent the sentiments without needing any other images (or colouring!) Both were super quick to make and look gorgeous in real life.

The first one, above, features my newest die cut, the Orchard Frame set from Memory Box, as well as a fancy label from Spellbinders. I airbrushed some colour in the background. The sentiment in it, as well as the one below, are both from a Gina K set called Tree Silhouettes.
The second card, below, uses Spellbinders dies. I used the Bow Easy to make the gorgeous bow, and used black craft ink lightly on the edges of the plum papers in order to give some extra depth.

I'm entering both these cards in the following challenges:
Gina K Stamp TV - Feature the Sentiment
Hiding in my craft room - Die cuts
One Stop Craft Challenge - Anything Goes
4 Crafty Chicks - Dry embossing
Craft Spot - Emboss it
Jackson's Digital - CAS using 2 dies (see top card)
Paper Pretties - Sentiment as the focal point
Christmas Roses
Christmas is only two months away!!! I have started working on more Christmas cards so that I am ready this year, and unlike prior years, this time I'm actually going to mail the cards before New Years LOL!

This is a Flourishes image featuring Christmas roses. It's been coloured with Copics. All layers were die cut with the A2 Card Creator dies by Spellbinders, except for the sentiment,
I'm entering this card in the following challenges:
Flourishes - Winter Inspiration
ABC Christmas Challenge - U is up to you
Totally Paper Crafts - Christmas
Hiding in my craft room - Die Cuts
Fussy and Fancy - Anything goes
Christmas Window Scene
Here are a couple more cards that I made with my Grand Madison Window die. This die was a birthday gift from my family, and I have had a lot of fun creating different cards with it, some looking outside, and these ones looking inside.

In this one (above) I stamped the tree using Tim Holtz Walnut distress ink, and heat embossed with clear embossing powder, then coloured with green Copics. used copics and sponging to add colour in the background of the tree. When dry embossing the background brick wall, I first inked the embossing folder with black craft ink. The curtains are made using some lace from the fabric store. I've added red liquid pearls to the nose of the deer.

In this second card, I stamped the tree using green ink, and then sponged green colour over it, and then just added colour to some key ornaments with Copics. The rest is pretty much the same as the other one.
I'm entering these cards in the following challenges:
Flourishes - Winter Inspiration
Christmas Card Challenge - Bows
Jingle Belles - Holiday Creatures
ABC Christmas Challenge - U is up to you
Totally Paper Crafts - Christmas
Hiding in my Craft room - Die Cuts
Wednesday, October 17, 2012
Festive forest
Here is another similar card to the last, however I decided to try balancing out the layout with another embellishment on the side and to use the holly leaves rather than the flourishes. I think this came out more balanced than the other one.

I'm entering this card in the following challenges:
Gina K - Friday challenge - Christmas card with Distressing
ABC Christmas Challenge - U is for up to you
Anything goes - make your own embellishment (the poinsettia)
Through the craft room door - anything goes
Through the craft room door - anything goes
Subscribe to:
Posts (Atom)